I took a break from working on sailboats to build a tiny kayak. Here is a step-by-step construction guide.

I took a break from working on sailboats to build a tiny kayak. Here is a step-by-step construction guide.
No recent progress. I took time off with my wife to explore the Boundary Waters Canoe Area. Beautiful place, thought I did not take one of my home-built boats. They work fine for day trips on local lakes. For week-long trips with 20 mile paddles and portages through wildness; nothing beats a kevlar canoe.
As for boat building, here is a time lapse video on the work to date.
A sailboat needs three large dowels: two for the oars and one for the mast. Yesterday I spent hours working on the mast, and it isn’t complete. Making them is simple. Cut the corners off a 2×2 to create an octagon. Then cut those corners. Then sand.


Simple does not mean easy, though. The mast is eight feet long, so every cut (and there are about ten, total) must put the jigsaw blade throught eight feet of wood. Sanding also takes a while. Finally, mistakes happen. If you twist the jigsaw blade slightly, you end up taking too much wood. Such mistakes are visible because the mast is one of the most visible parts of the boat.
There are alternatives. Wood closet rods work fine. They cost about $10. I’ve only found them in 6-foot lengths or under, which is too small. The first mast I used was a closet rod. If you are short on time and eager to put yourself in the water, definately use a closet rod. I still prefer the slow and tedious way; not because of the $8 savings, but I prefer the look of a hand-cut mast. It has a jagged, “Hey I made this” feel. I also prefer having a pine mast on a pine frame. There are fewer choices in the world of closet rods, and I have yet to see a pine rod – not that I’ve been searching. Finally, mistakes happen and you may wind up needing to purchase another rod. The cost adds up.
Sailing and paddling is a fully engaging activity. Negotiate the wind and current.Immerse yourself in nature. Get a good workout. Or take a nap.
Add fishing to the mix, and you’re outright busy. When I get out on a lake, sail rope in one hand, fishing rod in the other, time swims away.
If that multi-tasking isn’t engaging enough … you can use your boat building hobby to improve your cooking skills.
Recently, for only the second time ever, I caught, filleted, cooked and ate a fish without leaving my boat. I’d intended to do this for a while; lack of opportunity, lack of luck and lack of skill held me back. Like any activity, fishing requires a mix of research and practice. I was weak on research. Why read about fishing? It’s not for book-ish people. The guys on “Grumpy Old Men” seemed like they can barely read. Plus, for every legitimate bit of advice, there are a hundred ‘tips’ from companies trying to sell you a fancy lure or expensive tackle.
Don’t let that stop you. Good information is out there. From a local DNR site, I learned that Half Moon Lake in Eau Claire, Wisconsin has smallmouth bass that feed after sunset near shoreline cliffs. I learned how to catch bass (the right way) from a book on general fishing techniques.
The information paid off. I caught a 12″ bass.

And enjoyed a snack without leaving the boat.
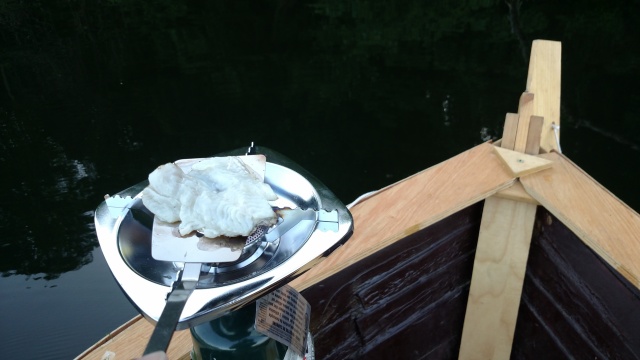

Yes, this is a camp grill on a wooden boat. Is that dangerous? Probably. There is no way in Hell I’d do it on a large lake with jet skis nearby. But Half Moon Lake had me covered. The wind was calm and there were no waves. Half Moon is a no wake zone.
The fish tasted alright. I need a better system for removing guts. Cleaning the boat afterwards took a half hour. I look forward to improving these skills to the point where I can take the boys out and show them that food isn’t just something we buy at a grocery store or order at a restaurant. Chances are the lake has edible fruits and vegetables, too.
Build your own boat. Catch your own fish. Feed yourself on the fish you catch. It’s satisfying. It’s … primal. It’s something you have the ability to do.
In spite of children, home projects, work and family duties … the boat and the book are coming along.
Tomorrow I finally have a chance to go fishing this season, on my 2015 boat, Rowan Zwischen den Wolken. As far as my wife is concerned, the purpose is to take photos and to figure out content for my sailing and fishing chapter. That is true. But between you and me … I’d go out with or without the need for book content. Chapter inspiration and research is just an added bonus.
Here is a time lapse of progress as of March this year:
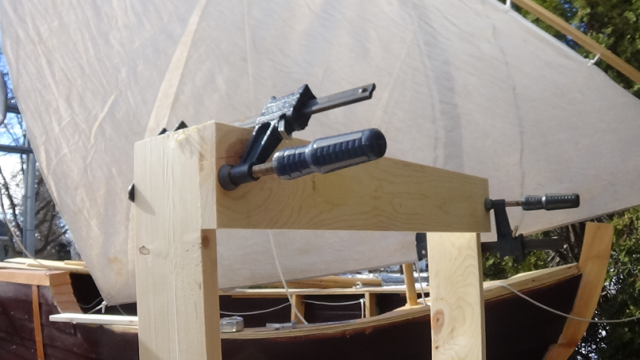
And a current photo:

Much has been done so far. Tools and supplies are purchased. The plan is complete. The boat platform is built. All the lofting lines are drawn. It is time to start cutting and joining. In this chapter we will cut the bottom part; draw the keel; cut the keel; and join the keel to the bottom.
Supplies needed:
If you have not used a jigsaw before, practice. Draw lines on wood and cut them. It doesn’t matter what you make. Practice cutting inch-thick pine. Practice cutting quarter-inch plywood. Like riding a bike or playing the piano, quality jigsaw use requires muscle memory. I can offer only five points of written advice:
Other than that, good cutting depends on your hands and arms.
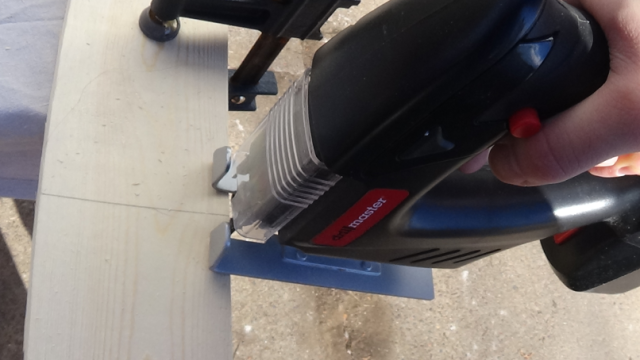
Let’s get to work. Choose a curve to cut first and clamp the plywood onto the boat platform. Make the the curve as close to the edge as possible without crossing it. The closer it is, the less wobbly it will be. At the same time, you don’t want to risk cutting into the boat platform. Here I managed about an inch clearance for the blade, which worked out fine:

… Yes, we had 8 inches of snow in early March. That’s life in Western Wisconsin.
The jigsaw blade is for rough, strait cuts. The loft line is a curve, but it is a big enough curve to look strait from a jigsaw blade’s perspective. For 1/4″ plywood, my cheap cordless jigsaw has plenty of power. When cutting, keep the edge of the blade along the outer edge of the pencil line. If the saw wanders, steer it back gradually. Abrupt turns look far worse than long, gradual turns. In any case, this sheet will be sanded and it is hard to predict what the final shape will be once the strakes are added. A 1/4″ could be sanded off.

Clamp the sheet in two places for stability, then cut away.


Note the 1″ x 4″s we placed on the boat platform for lofting are no longer needed. Only one corner of the plywood sheet needs to be stable. The other corners can hang off the edge. Also notice that my scrap came in four parts. You could cut out two long C-shaped pieces of scrap. I cut mine at the midpoint to avoid it snapping in half in my face.
The keel is next. A keel is the spine of a ship or boat. In this design it provides structural strength and grips the water for better sailing. Many small sailboats have removable keels that you can sink a few feet into the water. They allow a boat to sail into the wind and keep it stable. My boats aren’t built to do that. These are for cruising. The bottom is wide and flat. A stable fishing platform is more important to me than high speed.
But if you want a sinkable keel, go for it. I’d be happy to see your design.
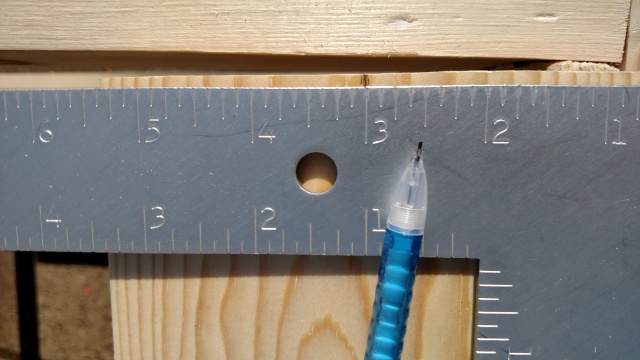
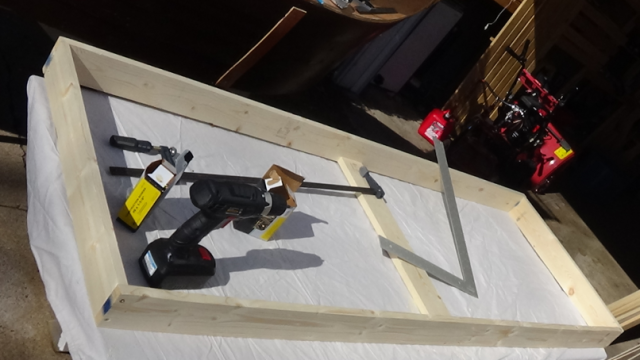
For this, you’ll need a carpenter’s square, three clamps and a flexible piece of scrap. Here I used a piece of trim. It’s longer than any scrap plywood I had on hand. Step one in building our keel? Find the center point.

From that center point, mark 3″ away from the edge. The keel will be 3″ tall.
Go to the opposite edge of the 1″x6″. At each corner, mark the 3″ point from the opposite edge. This will make sense soon.
Build a “crossbow”. The middle meets the 3″ mark at the center of the 1″x6″. The tips are at the corners of the 1″x6″. To recap crossbow building, see the previous chapter on lofting. 

Trace the curve. Then move the crossbow three inches. The center should line up with the edge of the 1″ x 6″. The tips of the crossbow should line up with the 3″ marks we drew on the sides. Trace again. The result is two curved lines that are parallel and exactly three inches apart.
Note the knot in the wood. I partially avoided it, but construction adhesive will eventually fill in the gap.
Now cut it. Brace the part at two points. I used my more powerful corded jigsaw for this cut. The cordless would have done the job, but not as quickly. When using corded jigsaws, pay attention to where the cord is. Cutting the cord and getting electrocuted is unlikely. Snagging the cord and wondering why the jigsaw doesn’t move forward; that happens to me all the time.


This next step takes skill. If you haven’t yet acquired skill, patience will do just fine. Line up the keel along the center of the bottom part. The tips of the keel should stick out past the tips of the bottom part. Adjust each end of the keel so they stick out an equal distance; about an inch, in my case. Then mark the spot where the tip of the bottom part overlaps the top of the keel. This is not the tip of the bottom part. This is about a quarter-inch away from that.


Also mark the tips of the bottom part at that point. Then cut.
Then cut the keel. If you measured correctly, both pieces should line up on both ends like so:

If they don’t line up perfectly, don’t worry. These edges will be covered in layers of wood, paint, and glue.
Now clamp the ends together and mark every six inches along the center line of the bottom part. Starting from one tip and moving to the other, attach the keel to the bottom part using 1″ screws. Take care here. The screws must be as vertical as possible. Otherwise, they poke out of the keel.

If a screw pokes through, it’s not the end of the world. Remove it and try again. As you attach, check the keel for such pokes.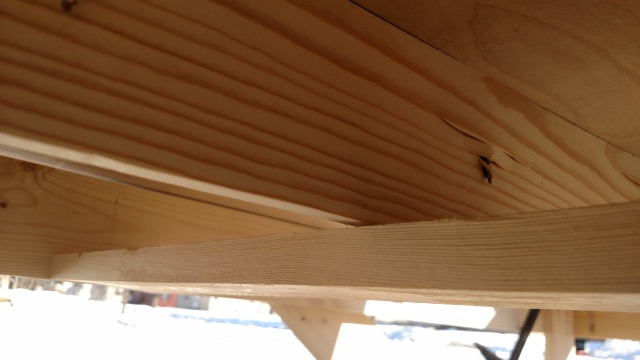
When all screws are in, flip the boat over and inspect your work.

This is starting to look like a boat! Get ready to work on the ribs, the stem and the stern.
Cutting wood is like cutting paper. Draw the shape of the cutout, then cut. Unlike paper airplanes or dolls, life-size wooden boat cutouts are big; six feet by four feet big, in this design. So how do you move the lines from your paper design onto the actual boat? Lofting.
Lofting is an old form of copying. Take lines from a plan, scale them up, and put them on wood. It sounds complicated. It’s not. The shipwrights of the 17 and 1800’s had to loft hundreds of pieces. For our boat, only the bottom part needs lofting.
Recall the simple plan:

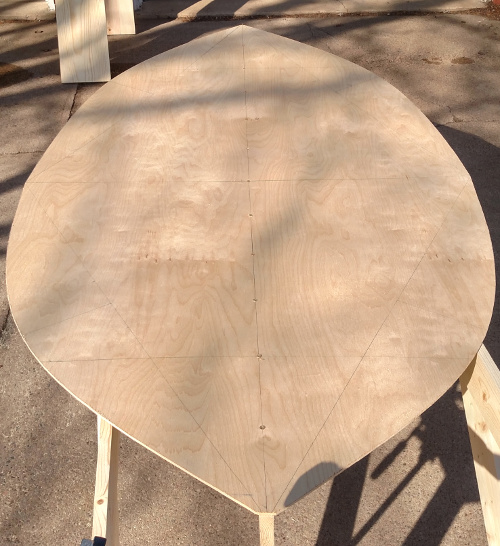
In this chapter, that oval drawing will be scaled up and put on a 4’x8′ sheet plywood. When cut, that oval will look like this:
And here are the lines. Only the curves will be cut. The other lines either help determine the shape of the curves, or direct us to place beams and screws in later stages of assembly.

What you need
Setup
The boat platform is complete, so a handy, movable table is already available. The platform isn’t wide enough to securely place a 4’x8′ sheet of plywood. To fix that, take a few 1’x4’s and line them up along the top of the boat platform. They don’t have to be even. About six is enough.

Only the far ends of the plywood hang out. That is no problem.

The big oval is symmetrical from front-to-back and side-to-side. The first step is to divide the plywood sheet into four equal rectangles. Slide the sheet so one short side is no longer drooping. Let this short side rest on one of the 1’x4’s.
Line the carpenter’s square up against a corner. Mark the 2′ point along the short side. If you buy expensive plywood – or if you are lucky and the sheet is part of a good batch – this 2′ point is at the exact center of the narrow end. Chances are, it isn’t. To check your mark, place the square on the opposite corner and mark the 2′ point again. Here, I was lucky. Both of my 2′ points are on the same spot. If the side isn’t exactly four feet wide, you’ll have two marks. These marks should be close enough for you to eyeball a center point to mark off.
To find a midpoint, always measure from two opposite sides.


How accurate should these measurements be? An eighth of an inch is passable. Nobody will notice a 1/8″ error when the boat is on the water. Keeping measures within 1/8″ is easy enough, too. With practice, measuring to within a 1/16″ easy. Practice away. You can always erase pencil marks.
We double-check measurements for big errors, not the 1/16″ goofs. It’s those 1 or 5-inch error that we need to watch out for. I built a chair and was so proud of a super accurate 5 15/16″ rabbit … until I realized the plan called for a 3 15/16″ rabbit. In the saying “cut once, measure twice”, “measure twice” is for brain fart insurance.
On to the long sides. If you have a tape measure, start at a corner and mark 4′ point. Approach from the opposite corner and repeat. Again, we want two marks from opposite ends to make sure the point is the exact center. If the two marks don’t overlap, eyeball and mark the mid-point between them. The goal isn’t to find the 4′ mark: the goal here is to find the center point. In my sheet of plywood, the center is at 4’1/8″. The sheet is 8’1/4″ long – I got an extra 1/4″ for free!
A carpenter’s square also works on the long side. Mark two feet, place the square on that mark, mark the next two. Two plus two equals four. Get the other 4′ point from the other side. Eyeball the midpoint of those marks.


The short sides have mid-point marks. The long sides have midpoint marks. That’s four marks, one in the middle of each side. Time to connect the dots. The goal is to form a cross that divides the plywood into four equal rectangles. Enter the strait edge. Four feet is a standard length. I own one and find it useful for many projects. The cheaper alternative is a strait length of wood.
Lay the wood (or strait edge) across the narrow part of the sheet at the 4′ marks. Hold it flat, and draw your line. That mark divides the plywood into two 4′ by 4′ squares.

Mark the center of that line. Again, measure it from one side of the panel, then the another. From one side of the sheet, measure 2′ in. Then do the same from the other side. Find the midpoint between the two marks. That is the center.

Place one end of the wood (or strait edge) on that center point. Place the other end at the midpoint of one of the short sides of the sheet. Draw the line. Repeat for the other side. The plywood is now divided into four equal 2′ x 3′ rectangles. Easy!
Things get interesting soon. Before then, we need four more lines. The plan calls for a 3′ 6″ wide by 6′ long oval. So far, we have a drawn a cross. One line is short (4 feet), the other long (8 feet). On the short line, mark the point that is 3″ from the each edge of the plywood. For the long line, mark 1′ from each edge. Then mark the edges. On each short edges, mark a point 3″ from each corner. On each long edges, mark a point 1′ point from each corner. Connect the dots.
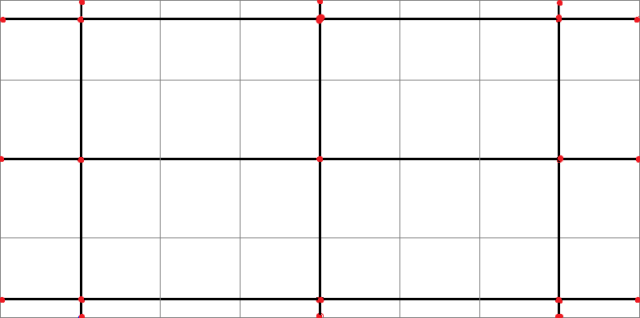
You should have a 6′ x 3’6″ rectangle inside the 8′ x 4′ plywood panel. In the picture above, each red dot is a mark, the thick lines are the lines that we drew.
Now for the curves. Start by drawing a diamond. Draw it like so:

No measurement is required here. Just connect the points. With the diagonals drawn, find and mark the midpoint of each. By now we’re experienced mid-point finders. It’s probably second nature.
Then, from each midpoint, use the carpenter’s square to draw a 90 degree line that points outward from diagonal:

Time to get out the clamps, a long 1’x4′, bits of scrap wood, and a flimsy long piece of scrap wood. I find scrap plywood works well as the flimsy piece.
Place two clamps on the edges of the plywood: one near the center of a short edge, and one near the center of a long edge. Put pieces of scrap under the clamps. The idea is to brace the flimsy piece to the points of the diamond we just drew. The clamp at the long end of the diamond probably won’t reach, so use a large piece of scrap.


Now line up a 1′ x 4′ over that 90 degree diagonal line that juts out from one of the diamond lines. This 1′ x 4′ will push the center of the flimsy piece of scrap outward.
Place the flimsy piece between. Make sure the INNER part lines up with the diamond points at the ends. To hold down the curve, you may want to brace it with a fourth clamp and some scrap wood. Does it look like a crossbow? Good. That’s what we want.

Adjust the 1′ x 4′, pushing the flimsy piece out as far as needs to be in order to look like an oval curve.

And trace along the inside of the flimsy part.
 This is Leonardo-esque curve is the result:

The 1′ x 4′ blocked us from tracing the junction of the curve and the diagonal line. Fill the gap using a strait edge or ruler. Then, starting at the edge of the diamond, measure exactly where the curve meets the diagonal. This step is important. It tells us where to place the middle of the flexible scrap on the remaining curves. My mark is at 6 3/8″. Therefore, I marked the 6 3/8″ point along my other three diagonals. Double check this measurement: accuracy will make the boat symmetrical.


Make three more crossbows. I made sure each flexible part lined up at the 6 3/8″ mark along the diagonals. Do the same for yours. Draw three more curves.

Your reward will be an attractive and symmetrical oval. Before we wrap up, there are two more lines to draw. These, the thick red lines below, tell us where to place some ribs later on.

From each tip of the oval, measure inward and mark 1 foot. Using the carpenter’s square, draw a perpendicular line from this point to the curve.
Does your plywood look like this?
Great! Get out your jigsaw.
You can build a boat without one of these. But you wouldn’t want to.

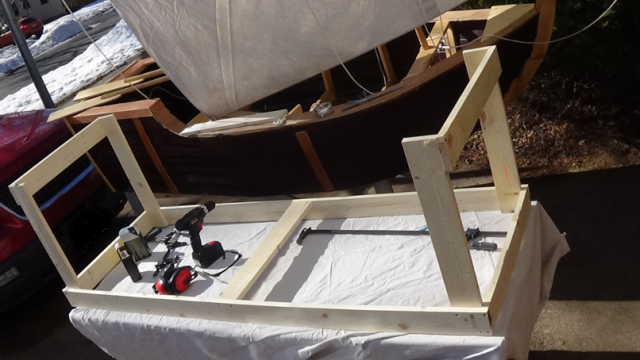
A boat platform – and I have no idea if there is a formal word for it – is a mobile work bench and storage space for your boat. They allow you to move the boat during construction. Maybe you need to move it out of the way for an odd shaped piece of plywood. Maybe you want to take advantage of a nice day. When the boat is covered in urethane, paint or epoxy, putting it outdoors on a sunny day guarantees quick and well-ventilated drying. Rain clouds coming? Roll the boat back into the garage. After construction, boat platforms allow you to roll the boat from the garage and back to the vehicle.
These are also cheap and easy to build. Creating the platform is a good way to warm up to the more demanding carpentry required by the boat itself. Let’s start.

Here is everything you need:
Step 1: Measure


Take 2 of the chords and mark it at 3 feet. These are the long beams and this marks the location of the center piece.
Next take another chord and draw a line at the 2 foot mark. An easy way to do this is line up the carpenter’s square with the wood and mark the end. When complete, draw a line using the ruler. Using the same piece of wood, measure out another two feet. The platform needs 9 two-foot beams. Repeat until three of the pine chords are marked. Each chord will be cut into three 2-foot pieces.
Step 2: Cut
Clamp each chord to the work table with two clamps. It’s tempting to save time and use only one. I’ve made that mistake before. If only one clamp is used, that clamp acts like a pivot, no matter how tightly clamped. The wood moves the moment the saw blade hits it. Two clamps keep the wood from moving.
Always read the included safety instructions before using a power tool. Wear goggles. Protect your ears. All it takes is one tiny mistake to ruin your day. If you are new to carpentry, I practice cutting lines and curves on scrap wood. Like playing an instrument or riding a bike, jigsaw operation uses muscle memory. The more you practice, the more accurate you are. I’ve been using jigsaws for enough years that I prefer them over miter and circular saws for most cuts because I can get straighter line.

Here is the end result. Don’t be discouraged if some pieces are 1/16 of an inch longer than others. For this platform, perfect accuracy doesn’t matter. Think of the picture of the completed project. Can you tell which beam is the long one, which is short one? The platform’s job is to be strong enough to hold your boat. It doesn’t have to be pretty. Given more time, I could have measured more carefully. I could also sand and stain these beams to look like works of art. And I could still be working on the platform today.
In this project, perfect is the enemy of the good.
Step 3: Line it up

Take the two long pieces and two of the two-foot pieces. Find the three foot mark you made earlier and lay a two-foot piece flat. Carefully center the two-foot piece on that mark. Then place another two-foot piece at the end. Hold it together with the long clamp.


Now it is time to fiddle and adjust. Place the carpenter’s square on a corner and line up the end piece. Make sure the angle is 90 degrees. Do the same on the other corner. The flat piece might need to be shifted. To make sure the flat part is centered on your three-foot mark, trust your eyeballs. You may need to loosen the clamp to make adjustments.
When everything is as square and aligned, tighten the clamp.
Step 4: Join


Use the power drill to indent the wood in the place shown above. This hole prevents the screw from cracking the wood, so it needs to be done whenever you screw into the end of a chord. This part takes some muscle work: you’ll want to get the hole about a quarter inch deep. One workaround is to use a quarter-inch drill bit.
With the hole made, take a 2-inch screw and drill it in.


Repeat until the two short pieces are attached to the long piece. Note where the screws are attached: two per joint.
When that is complete, add the third short piece and screw it in. Because the platform is already square there is no need to use the carpenter’s square for this part.
Step 5: Add the legs


Before adding legs, flip the platform over. This is important. The flat piece has to lay low because the center of the boat is the lowest part. The boat platform is a cradle.
For each leg, take a two-foot piece and line it up as seen. Clamp it tight. A single clamp will do, since the leg is braced by the parts you’ve already assembled. Get out the 1 1/4″ screws.


The legs need to be firmly attached. Imagine rolling the platform along the driveway. You and hit a crack and the cart comes to a stop. A hundred pounds of boat and equipment might riding on the platform; a lot of horizontal forward and backward force is in play. To prevent each leg from snapping off, three screws hold it in. Attach the leg to the short side (a two-foot board) with a single 2″ screw. Use two 1 1/4″ screws, placed diagonally like the #2 face of a die, to attach the leg to the long beams. Remember to drill indents into the wood to prevent cracking. Repeat for each leg.
Step 6: Add the feet
Add a two-foot piece to the end of each pair of legs. This adds a little bit of structure strength and provides a place to attach castors or a dolly. You might ask for an extra set of hands to help clamp these in place. Otherwise, simply line up and screw them in. Nothing fancy, here. Use two 2″ screws.

Step 7: Add leg bracing
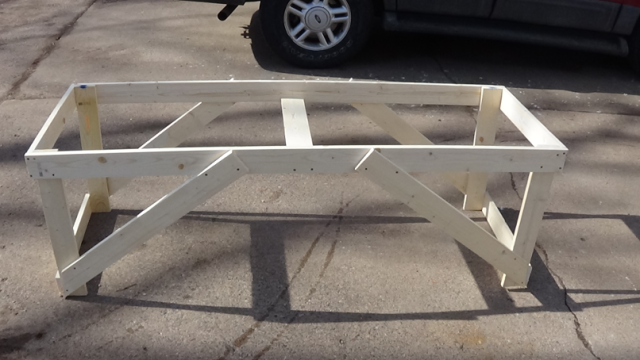
By now, if your the boat platform looks like this:
… you’re in good shape. The end is near. The platform is strong enough to handle hundreds of pounds (I don’t know many hundreds) of vertical force. That’s far more than you need. However, the legs could still be snapped off by hand if somebody pushes or pulls hard enough. The leg braces prevent this.
Here comes the fanciest carpentry of the project, which isn’t much. Take two remaining 1 by 4’s and draw a 45-degree line from the tip using the ruler. Then measure and mark 3 feet, which is roughly the center of each board. Draw a strait line at the center, and use the jigsaw to cut it just like you cut the legs. Then cut along the 45-degree angle line. Repeat for the remaining leg braces.


Attach the tip of each leg brace to the legs like so:
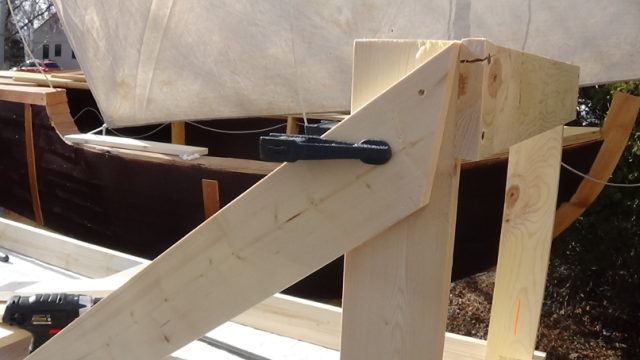
The other end will look like this:

The face of the leg brace does not line up with the leg or the side of the platform. The legs are an inch closer together than the sides of the platform. That’s OK. When you screw the braces on, the wood bends and everything fits snug. Again, it doesn’t have to be pretty.
Here is where to place the screws. The general rule is, for each joint, use two screws and place them as far apart as possible.


When all four leg braces are attached, you have a boat platform:
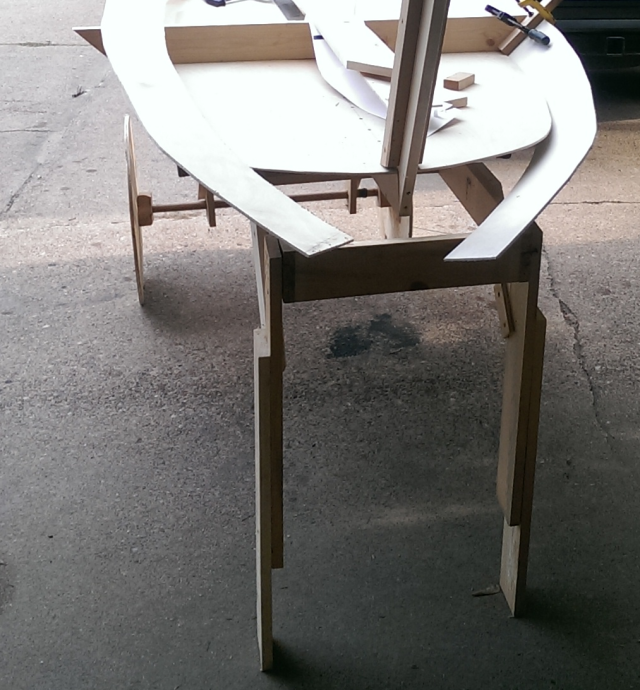
Step 8: Add wheels
From here, you can add castors. I found a good deal on 4″ castors. Check the size of the holes. The screws I had purchased did not have a wide enough head, so I had to scrounge around the garage for screws that fit. Attach them along three points as shown.


The end result:

This simple construction platform is the workshop from which a nice boat will emerge. These mini-tables give you a good carpentry warm-up prior to the build. They provide a convenient mobile work space during construction. And they make moving and storing your completed boat easy. This un-glamorous platform is essential for a satisfying boat building experience.
The book is coming along. This week I am writing about building platforms. These wheeled tables are three items in one: a mobile workshop, a transport aid and a storage unit. As easy and inexpensive as they are to make, they play a key role in boat building and enjoyment.
In the next few weeks, I plan on building a platform for the new boat and documenting the process in detail.
The book is on track for Fall, 2018 completion. Tentative title: “Tiny Sailboats YOU Can Build” … I’m open to suggestions.


 Kids and boat building can go together. My kids have been involved since the start. It’s great. You get to hang out with the kids, Mom gets to relax, the monkeys get to be impressed by their dad. And they learn useful skills for later in life. When I’m old and lazy, it would be nice to have some teens who can fix a broken whatever at a moment’s notice.
One word about working with your kids: SAFETY.
That picture you see freaked out my mother-in-law. Maybe she thought her grandson was about to screw his tongue to the roof of his mouth … Not quite! The power drill battery was dead. I made sure about that. Kids are more nimble than you think. They find amazingly creative ways to cause havoc. Before you set the kids anywhere near your tools, make sure you know where all of your tools are. Know which tools to keep out of reach, and never let your kids out of your sight.
When you know you’ve done all you can to keep the munchkins safe, then the fun begins. Kids can “help” at any age. For example, I completed the plans to Rowan Zwischen den Wolken on a sunny day on a blanket while watching my son, Rowan. He was maybe six months old.

My older son, Grant, can work a power drill, so sometimes he performs useful tasks.

Be careful about trusting kids with too much responsibility. A second after this photo was taken, Grant efficiently poked a large hole in the side of the boat.
If you aren’t ready to give your kids actual work, it’s easy to make them think they are being useful. This keeps them out of trouble and allows you to work. I also found that, when they feel useful, they are more interested in your fatherly boat building wisdom. Below is the younger version of Grant working on a different boat. He is happily and harmlessly banging away at the hull with a plastic hammer.

Working with one kid at a time is easier than two. Siblings egg each other on. You have twice the chaos to track, as well. Two kids also enable a great brother bonding experience.

One kid, or two; don’t expect to get much done. Safety must be priority one, followed by the kids’ entertainment, followed by protecting your craft work from toddler terror. But you make a little progress, which is better than no progress at all. And you teach your kids useful lessons in tool handling and safety; lessons that come in handy later in life.
A few more thoughts. Don’t force your kids into boat building. Every kid is different. Some don’t care. If your kids have no interest, let boat building be your thing. Making them work on the boat, or making them hang out near the boat when they don’t want, will backfire.
Finally, raising kids is time consuming. Take time for yourself, too. Give yourself a defined chunk of minutes or hours that you control. If you want to build a boat, having kids doesn’t have to be an obstacle. I believe taking time for yourself makes you a better father and better spouse.
