
You can build a boat without one of these. But you wouldn’t want to.

A boat platform – and I have no idea if there is a formal word for it – is a mobile work bench and storage space for your boat. They allow you to move the boat during construction. Maybe you need to move it out of the way for an odd shaped piece of plywood. Maybe you want to take advantage of a nice day. When the boat is covered in urethane, paint or epoxy, putting it outdoors on a sunny day guarantees quick and well-ventilated drying. Rain clouds coming? Roll the boat back into the garage. After construction, boat platforms allow you to roll the boat from the garage and back to the vehicle.
These are also cheap and easy to build. Creating the platform is a good way to warm up to the more demanding carpentry required by the boat itself. Let’s start.

Here is everything you need:
- (3) clamps: (2) 12-inch and a 2 1/2 foot clamp
- Goggles and ear plugs: as needed for any woodworking
- Power drill
- Jigsaw: For cutting 1 by 4’s, an inexpensive cordless works fine. I go cordless whenever possible to avoid hassling with outlets.
- (1) 1/4-inch and 2-inch wood screws
- A carpenter’s square.
- A ruler with 90 degree and 45 degree angle.
- A tape measure.
- (6) 1″ x 4″ x 6′ pine chords. Get the cheapest you can find. Looks aren’t important here.
- A dolly or (4) castors.
Step 1: Measure


Take 2 of the chords and mark it at 3 feet. These are the long beams and this marks the location of the center piece.
Next take another chord and draw a line at the 2 foot mark. An easy way to do this is line up the carpenter’s square with the wood and mark the end. When complete, draw a line using the ruler. Using the same piece of wood, measure out another two feet. The platform needs 9 two-foot beams. Repeat until three of the pine chords are marked. Each chord will be cut into three 2-foot pieces.
Step 2: Cut
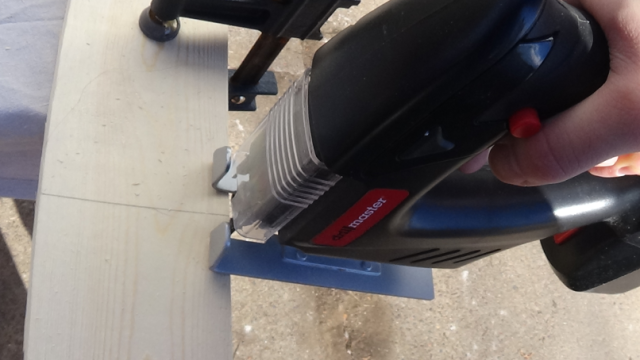
Clamp each chord to the work table with two clamps. It’s tempting to save time and use only one. I’ve made that mistake before. If only one clamp is used, that clamp acts like a pivot, no matter how tightly clamped. The wood moves the moment the saw blade hits it. Two clamps keep the wood from moving.
Always read the included safety instructions before using a power tool. Wear goggles. Protect your ears. All it takes is one tiny mistake to ruin your day. If you are new to carpentry, I practice cutting lines and curves on scrap wood. Like playing an instrument or riding a bike, jigsaw operation uses muscle memory. The more you practice, the more accurate you are. I’ve been using jigsaws for enough years that I prefer them over miter and circular saws for most cuts because I can get straighter line.

Here is the end result. Don’t be discouraged if some pieces are 1/16 of an inch longer than others. For this platform, perfect accuracy doesn’t matter. Think of the picture of the completed project. Can you tell which beam is the long one, which is short one? The platform’s job is to be strong enough to hold your boat. It doesn’t have to be pretty. Given more time, I could have measured more carefully. I could also sand and stain these beams to look like works of art. And I could still be working on the platform today.
In this project, perfect is the enemy of the good.
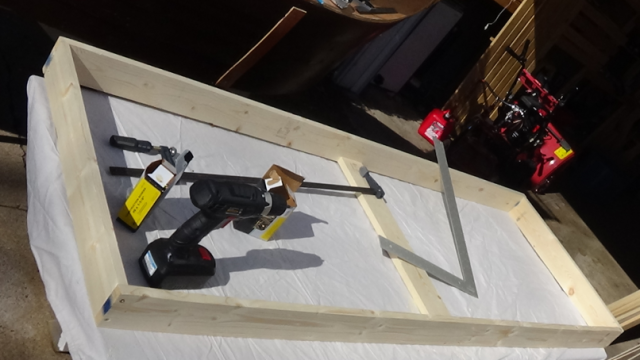
Step 3: Line it up

Take the two long pieces and two of the two-foot pieces. Find the three foot mark you made earlier and lay a two-foot piece flat. Carefully center the two-foot piece on that mark. Then place another two-foot piece at the end. Hold it together with the long clamp.


Now it is time to fiddle and adjust. Place the carpenter’s square on a corner and line up the end piece. Make sure the angle is 90 degrees. Do the same on the other corner. The flat piece might need to be shifted. To make sure the flat part is centered on your three-foot mark, trust your eyeballs. You may need to loosen the clamp to make adjustments.
When everything is as square and aligned, tighten the clamp.
Step 4: Join


Use the power drill to indent the wood in the place shown above. This hole prevents the screw from cracking the wood, so it needs to be done whenever you screw into the end of a chord. This part takes some muscle work: you’ll want to get the hole about a quarter inch deep. One workaround is to use a quarter-inch drill bit.
With the hole made, take a 2-inch screw and drill it in.


Repeat until the two short pieces are attached to the long piece. Note where the screws are attached: two per joint.
When that is complete, add the third short piece and screw it in. Because the platform is already square there is no need to use the carpenter’s square for this part.
Step 5: Add the legs


Before adding legs, flip the platform over. This is important. The flat piece has to lay low because the center of the boat is the lowest part. The boat platform is a cradle.
For each leg, take a two-foot piece and line it up as seen. Clamp it tight. A single clamp will do, since the leg is braced by the parts you’ve already assembled. Get out the 1 1/4″ screws.


The legs need to be firmly attached. Imagine rolling the platform along the driveway. You and hit a crack and the cart comes to a stop. A hundred pounds of boat and equipment might riding on the platform; a lot of horizontal forward and backward force is in play. To prevent each leg from snapping off, three screws hold it in. Attach the leg to the short side (a two-foot board) with a single 2″ screw. Use two 1 1/4″ screws, placed diagonally like the #2 face of a die, to attach the leg to the long beams. Remember to drill indents into the wood to prevent cracking. Repeat for each leg.
Step 6: Add the feet
Add a two-foot piece to the end of each pair of legs. This adds a little bit of structure strength and provides a place to attach castors or a dolly. You might ask for an extra set of hands to help clamp these in place. Otherwise, simply line up and screw them in. Nothing fancy, here. Use two 2″ screws.

Step 7: Add leg bracing
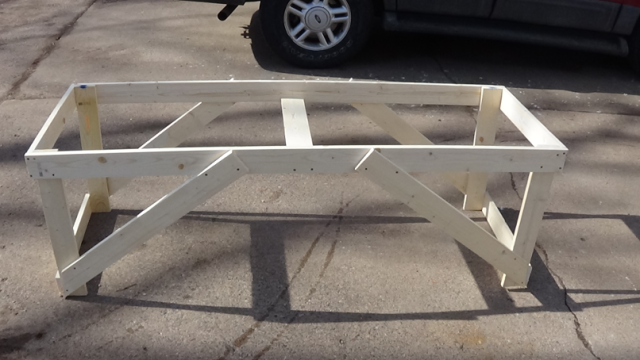
By now, if your the boat platform looks like this:
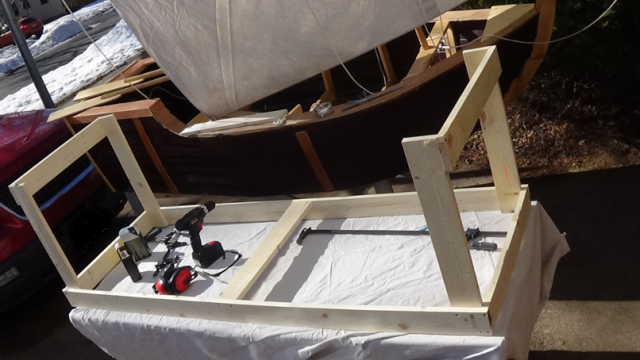
… you’re in good shape. The end is near. The platform is strong enough to handle hundreds of pounds (I don’t know many hundreds) of vertical force. That’s far more than you need. However, the legs could still be snapped off by hand if somebody pushes or pulls hard enough. The leg braces prevent this.
Here comes the fanciest carpentry of the project, which isn’t much. Take two remaining 1 by 4’s and draw a 45-degree line from the tip using the ruler. Then measure and mark 3 feet, which is roughly the center of each board. Draw a strait line at the center, and use the jigsaw to cut it just like you cut the legs. Then cut along the 45-degree angle line. Repeat for the remaining leg braces.


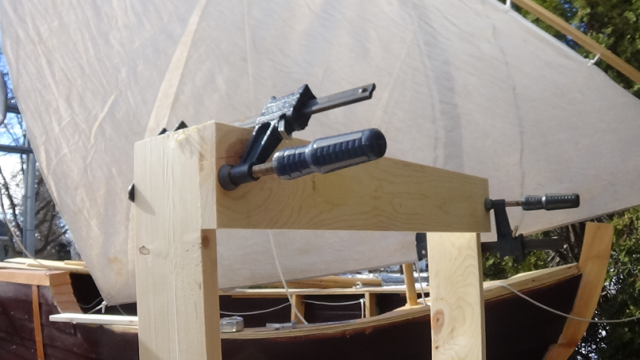
Attach the tip of each leg brace to the legs like so:
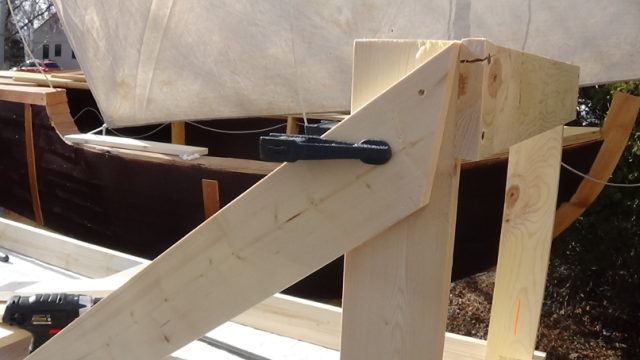
The other end will look like this:

The face of the leg brace does not line up with the leg or the side of the platform. The legs are an inch closer together than the sides of the platform. That’s OK. When you screw the braces on, the wood bends and everything fits snug. Again, it doesn’t have to be pretty.
Here is where to place the screws. The general rule is, for each joint, use two screws and place them as far apart as possible.


When all four leg braces are attached, you have a boat platform:
Step 8: Add wheels
From here, you can add castors. I found a good deal on 4″ castors. Check the size of the holes. The screws I had purchased did not have a wide enough head, so I had to scrounge around the garage for screws that fit. Attach them along three points as shown.


The end result:

This simple construction platform is the workshop from which a nice boat will emerge. These mini-tables give you a good carpentry warm-up prior to the build. They provide a convenient mobile work space during construction. And they make moving and storing your completed boat easy. This un-glamorous platform is essential for a satisfying boat building experience.
